AI 3D Model Generator Tips: How to Get Perfect Results from KishMake
I have made more than 900 models with KishMake. Here is what I learned about what to do and what not to do, with real before-and-after examples from my own tests.
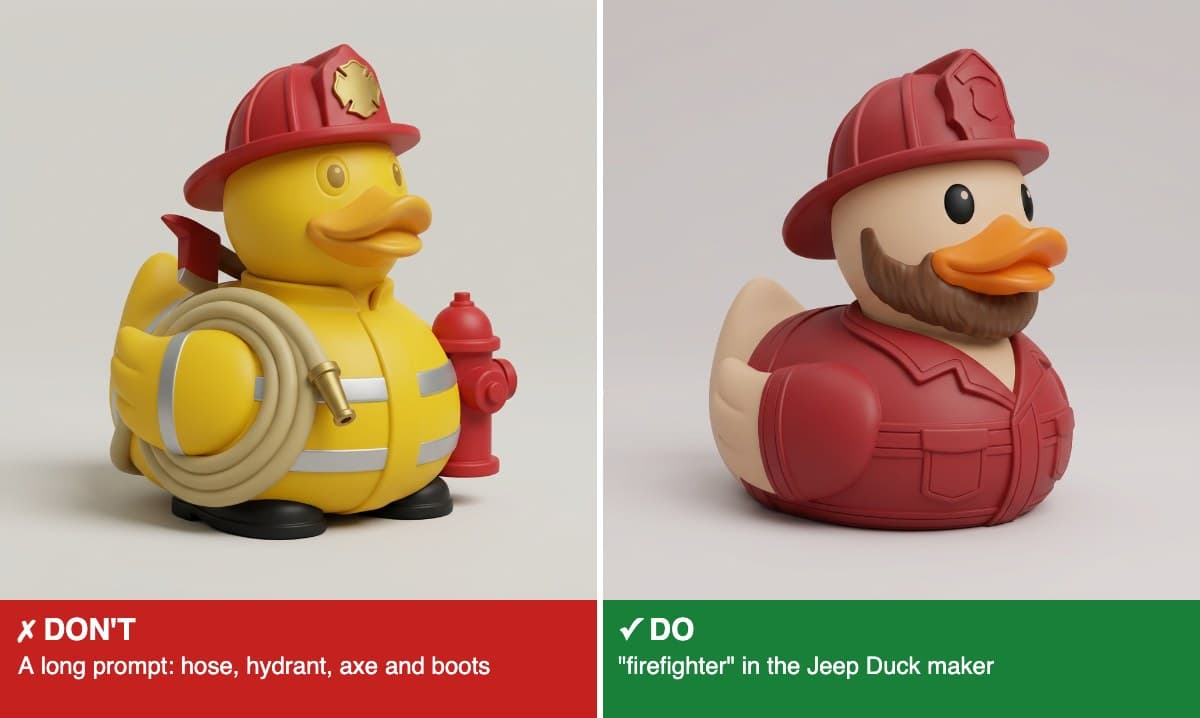
Same template, two prompts. The long one added a hose, a hydrant and boots; "firefighter" alone gave the clean duck.
These AI 3D model generator tips come from more than 900 models I have made with KishMake myself: ducks, ornaments, chess sets, lamps, flexi toys and wine holders. After all of them, I found that most bad results come from the same few habits, and almost all of them come down to saying too much. KishMake already knows a lot about 3D printing. I get the best results when I let it do its job and tell it only what it can't guess.
Here is what I learned to do and not to do, with real before-and-after examples from tests I ran this week.
1. Pick the template by what the object has to do
I always choose the template for the job first and the look second. An ornament needs a hanging loop, a plant pot needs drainage, a Leggy Buddy needs kicking legs and an articulated toy needs joints. The template already knows how to build those parts. If no template fits, I use free text or start from an image.
2. With a template, write one to six words
The template carries the style, the proportions and the print rules. Your words only need to say what it is. "Firefighter" is a complete prompt for the Jeep Duck maker. When I wrote a paragraph about the helmet, hose, axe, boots and a fire hydrant, I got all of it: a coiled hose, a hydrant glued to the side and boots on a rubber duck. Every extra prop is one more thin part that can come out strange in 3D.
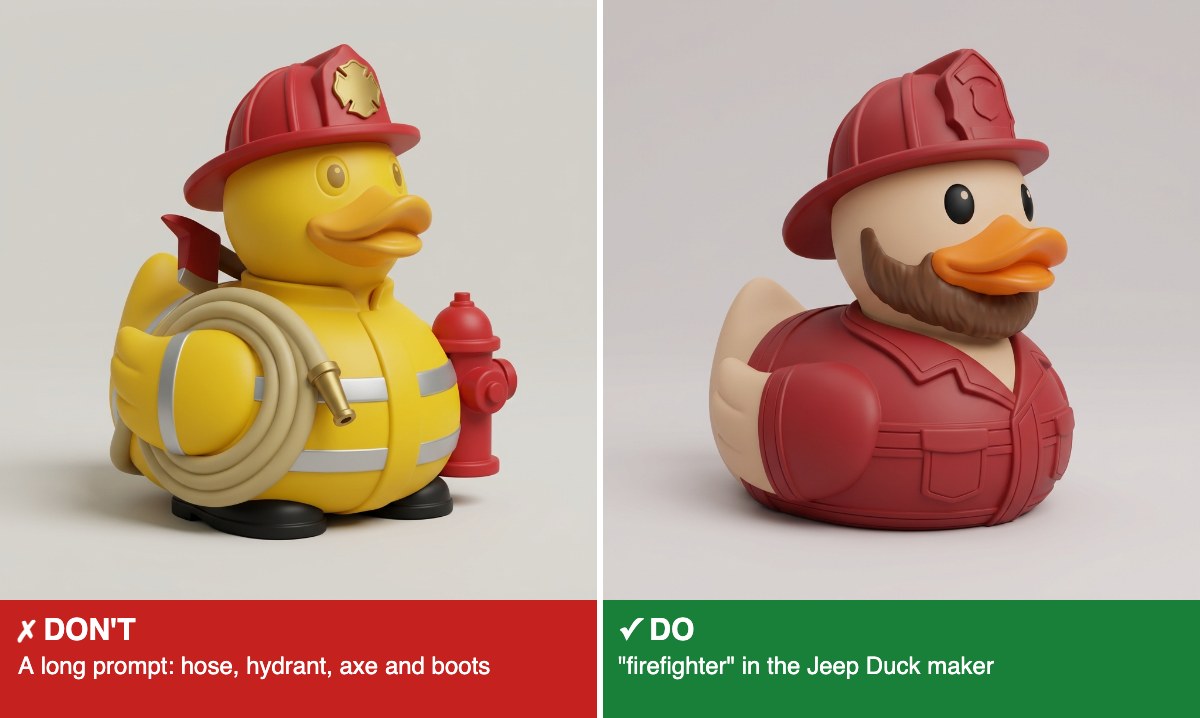
I learned this one the hard way. My first Santa duck came from a long prompt that described the hat, beard, coat, belt and a gift sack. In 3D, the sleeve cuffs turned into floating rings and the sack string became a red stick. I rebuilt it with one word, "santa", and the wing came out clean.
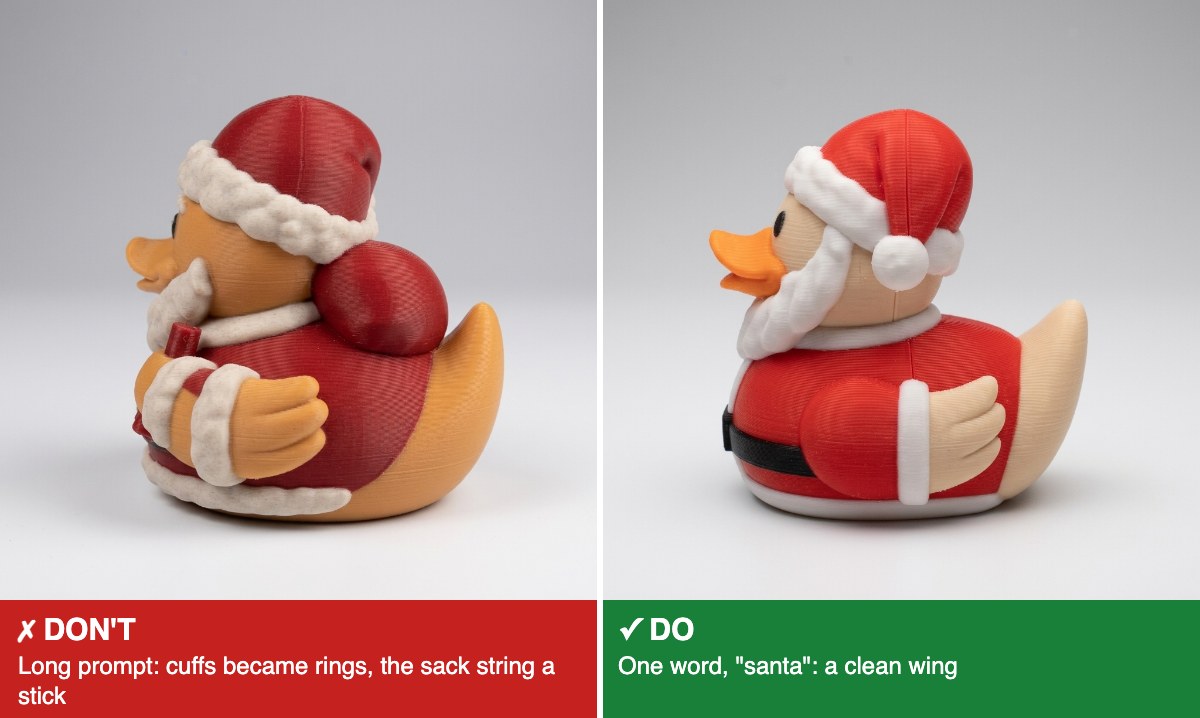
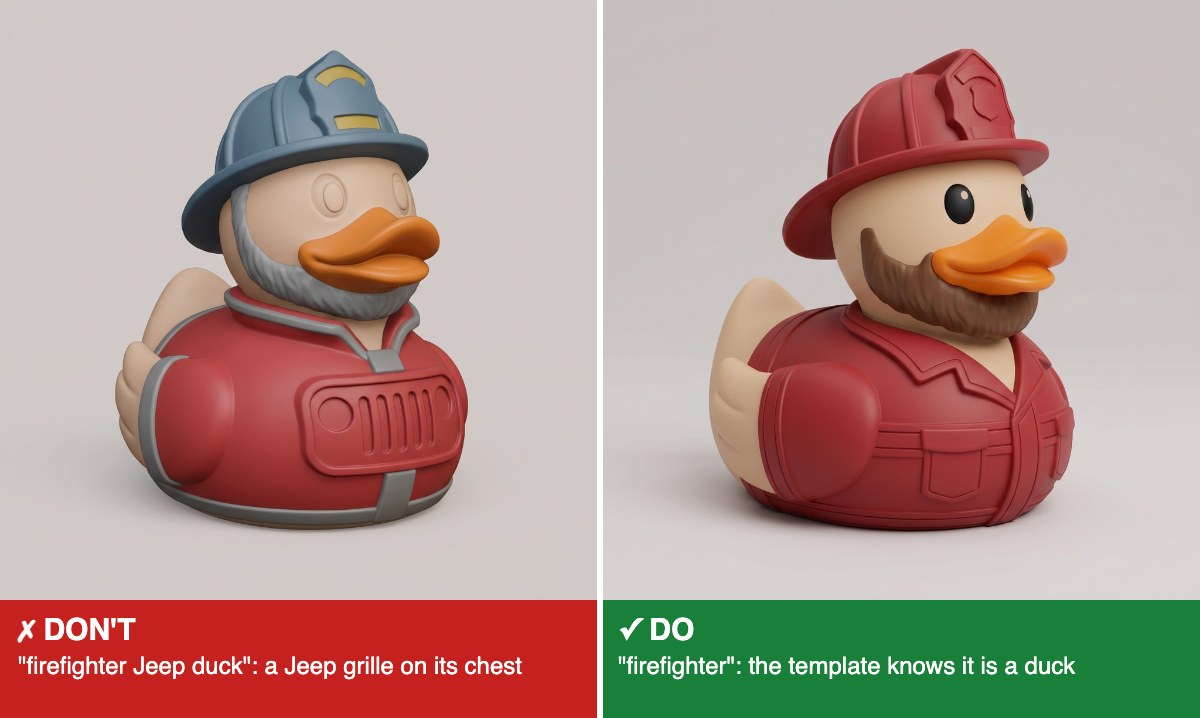
Don't tell the template what it already is. The Jeep Duck maker knows it is making a duck. When I wrote "firefighter Jeep duck", the word Jeep came out as a Jeep grille on the duck's chest. Write only what makes your version different:
Jeep Duck maker: "firefighter", not "firefighter Jeep duck"
Articulated toy maker: "dragon", not "articulated flexi dragon with joints"
Ornament maker: "snowman", not "snowman ornament with a hanging loop"
Leggy Buddy maker: "frog", not "frog with kicking legs"
3. Don't waste words on what you don't want
It is tempting to write "cowboy, no boots". In my tests this week, "cowboy, no boots", "pirate, no parrot" and "witch, no broom" all came out fine, because the AI simply ignored the "no". So at best those words do nothing. At worst they backfire: on one of my real products, a long "no boots and no shoes, plain bare feet" phrase is exactly what put feet into the picture. If you don't want something, leave it out, or describe what you want in its place.
4. Without a template, describe the object properly
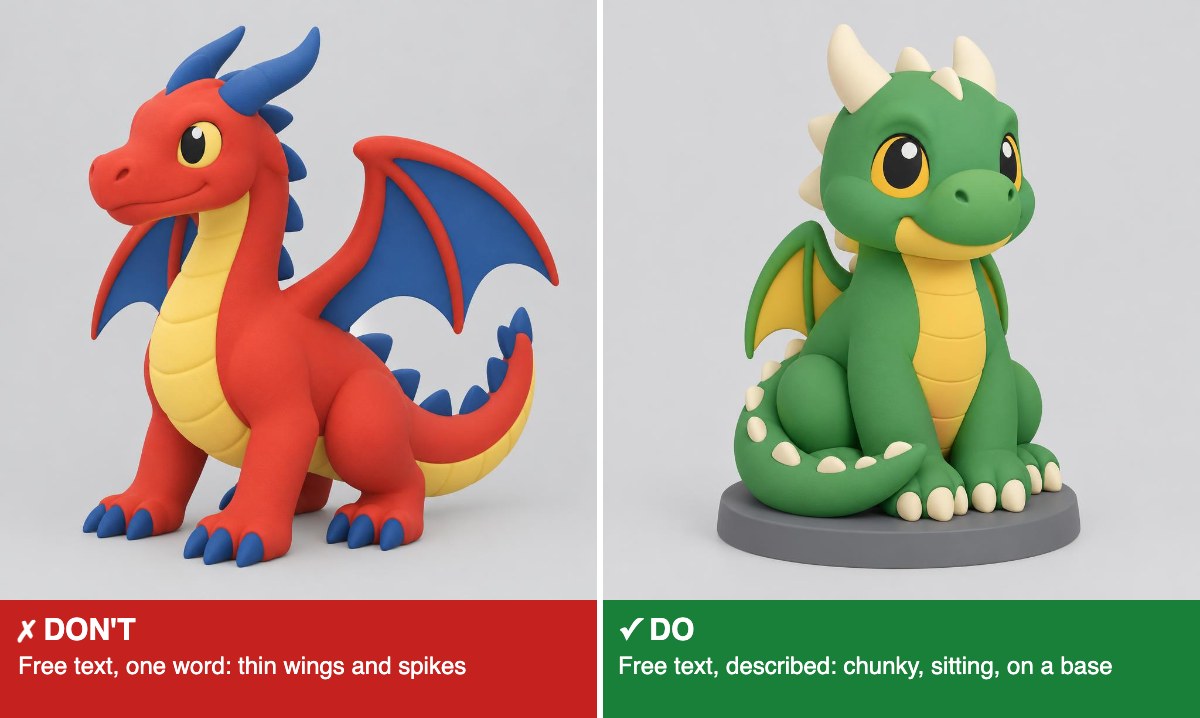
Free text is the exception to rule 2. With no template, nothing is carrying the style, so one word gives the AI too little to work with. "Dragon" gave me a standing dragon with thin wing membranes, spikes and claws: hard to print and easy to break. A short description of a chunky baby dragon sitting on its tail, with folded wings and a flat base, gave me a figure that prints well. Describe the shape, the pose and the few details that matter, and ask for a base if it has to stand.
5. Don't draw the engineering
Hanging loops, holes, pegs, magnet pockets, joints and drainage are added by the template or the print engineer, measured and placed where they work. Whenever I asked for them in the picture, I got a drawn hole in the wrong place that the real one then had to fight. Describe the object, not the hardware.
6. Moving parts are added after the model is ready
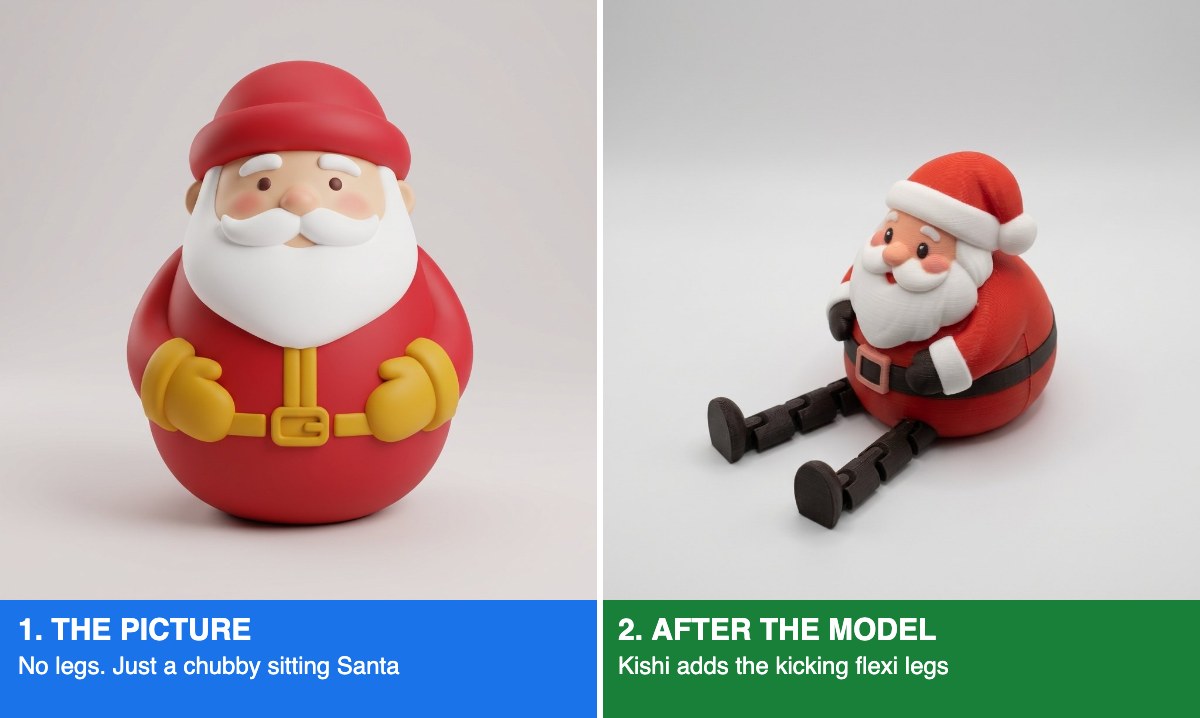
The cuts happen after the model is ready. Anything that moves or comes apart is made once the 3D model exists: the joints of a flexi toy, the kicking legs of a Leggy Buddy, the three pieces of a grinder, the twisted slices of a slime fidget, or a model split into parts. The template's cutter or Kishi, KishMake's print engineer, adds them to the finished model, measured and with proper clearances so they actually move. So don't ask for moving parts in the prompt, and don't try to get them into the picture.
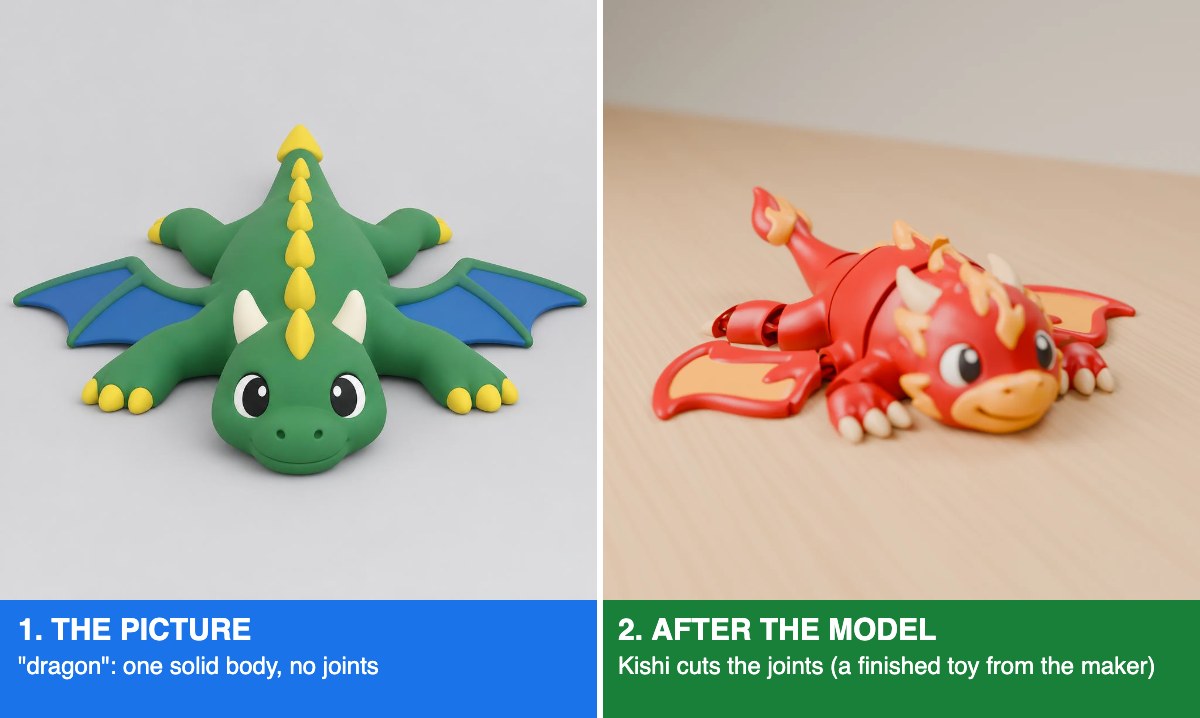
Articulated toys work the same way. In the articulated toy maker, "dragon" is enough. I also tried "articulated flexi dragon with movable joints" and got almost the same solid dragon. The template already knows that is the goal, so the extra words did nothing.
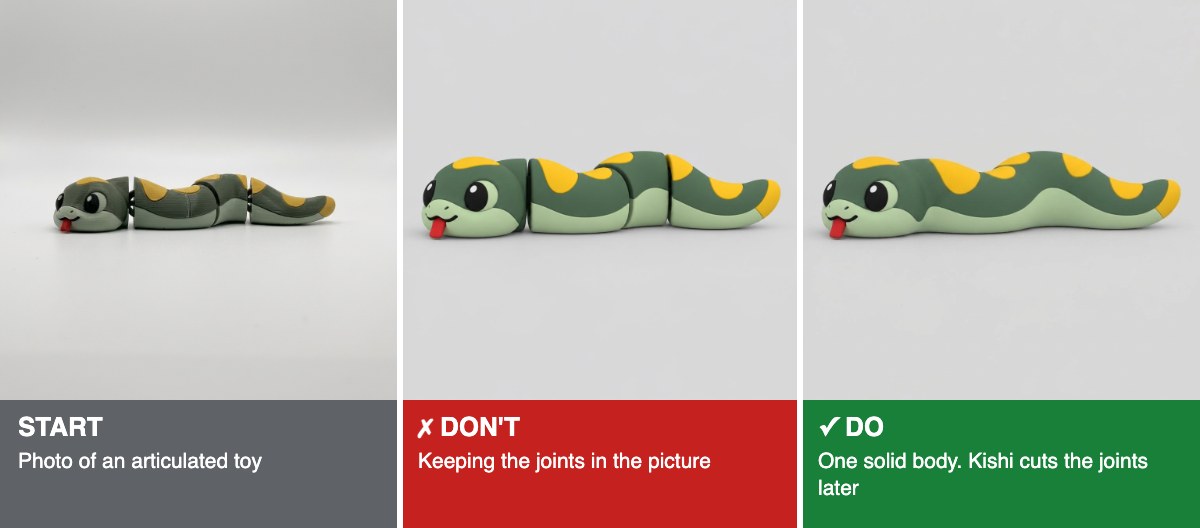
The same goes for a photo. If you upload a picture of an articulated toy, don't try to keep its joints. The maker turns it into one solid body by itself, and joints drawn into the picture only become fake grooves that don't move and get in the way of the real cut.
7. When you touch up, say what to change and where
Touch-ups edit the picture in plain words. I found they work best when you name the part, say where it is and say what has to stay the same. When I wrote "Make it more Christmassy", the AI had to guess, and it changed whatever it liked: string lights, holly, bells and stripes, all tiny details that won't print in one colour. "Replace the top hat on his head with a knitted bobble hat. Keep the face, the scarf around his neck and the rest of the body exactly the same" changed exactly one thing.
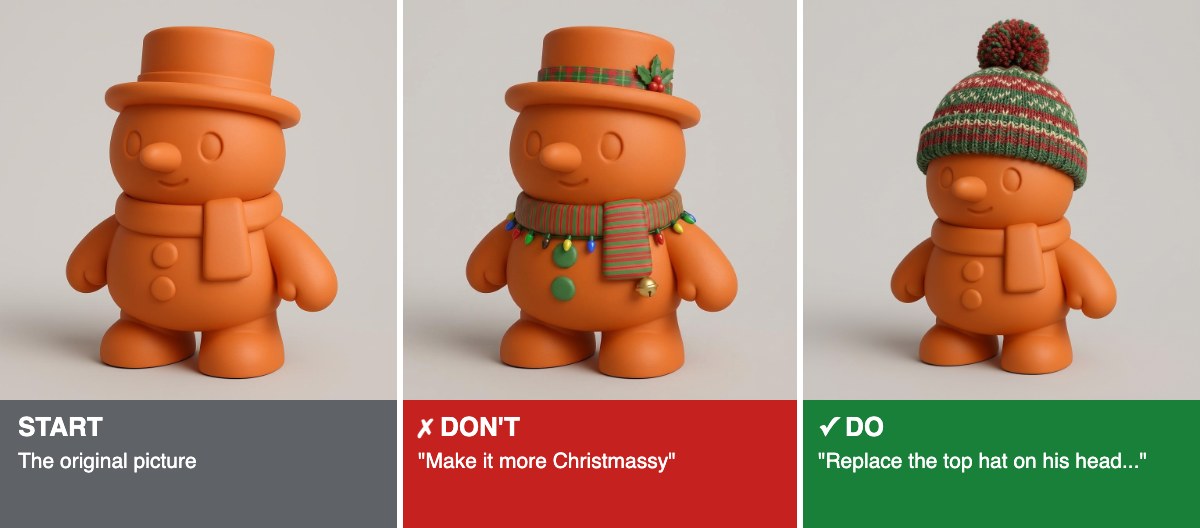
Every project includes two free touch-ups. After that they cost 2 credits each.
8. Check the picture before you press "Make it 3D"
Touch-ups only work on the picture. Once the 3D model exists, the picture is locked, and a fix means a new project. So I look closely before I generate: I count the arms and legs, check the hands, and look for props held by a thin string or a stick. Fixing it in the picture is cheap. Fixing it in the model costs a new project.
9. Keep it chunky
Image-to-3D flattens thin parts into plates and drops tiny details. In my models, spikes, fingers, whiskers, loose ropes and floating props either broke off the print or vanished from the model. Chunky shapes, thick limbs and features attached to the body print well.
10. Skip small lettering
Names and dates are too fine to survive the trip from picture to 3D model. I add them afterwards with a paint pen, or print a separate tag.
11. Let the print engineer do the extra jobs
Once the model is made, the print engineer on the model page can hollow it, turn it into a keychain, a planter, a piggy bank or a wall mount, split it into parts or add flexi legs. Each job costs 10 credits, makes a new version of the model and leaves the original alone, and you get the credits back if it can't deliver. It's a much more reliable way to get those features than asking for them in the picture.
12. Match the colours to your printer
Pick the number of colours your printer can actually handle. Single-colour models print fastest and are what most sellers choose for volume. Multi-colour 3MF files are great when you have an AMS or MMU, and my guide to multi-colour 3D models covers the setup.
AI 3D model generator tips: the quick checklist
Template: one to six words, subject only. Free text: describe it.
Don't repeat the template: "firefighter", not "firefighter Jeep duck".
Leave out what you don't want instead of writing "no".
No holes, loops or text in the picture.
Moving parts (joints, legs, grinder pieces) come after the model is ready.
Touch-up: what, where, and what stays the same.
Check the picture before you make it 3D.
New to KishMake? Start with the easiest way to design for 3D printing, and if you want to know why short prompts work, the idea comes from how text-to-image models weigh every word you give them.
Frequently asked questions
How long should a KishMake prompt be?
With a template, write one to six words about the subject only, like "firefighter" for the Jeep Duck maker. Don't repeat what the template already is: when I wrote "firefighter Jeep duck", I got a Jeep grille on the duck. Without a template, write a short description of the shape, the pose and a base if it has to stand.
Should I write what I don't want in the prompt?
No. In my tests the AI usually ignored words like "no boots", and on one of my real products a long negative phrase is exactly what put feet into the picture. Leave unwanted things out completely, or describe what you want in their place, and fix anything left over with a precise touch-up.
How do I make an articulated toy with KishMake?
Use the articulated toy maker and just name the animal, or upload a photo. Don't ask for joints or try to keep the ones in your photo: the maker builds one solid body by itself. Once the 3D model is ready, Kishi cuts it and adds real print-in-place joints with the right spacing and clearances.
How do I write a good touch-up?
Name the part you want to change, say where it is and say what must stay the same. "Replace the top hat on his head with a knitted bobble hat, keep the face and body the same" works far better than "make it more festive". Every project includes two free touch-ups, then each one costs 2 credits.
Can I change the picture after the 3D model is made?
No. Touch-ups only work on the picture, and once the 3D model exists the picture is locked. Check the arms, hands, props and overall shape before you press "Make it 3D". After the model is made, the print engineer can still hollow it, split it, add flexi legs or turn it into a keychain.
Related reading
Run a 3D-print store? Embed KishMake into your site.
Join the API waitlist for early access to design-on-demand for your customers.
